Snapping Simplicity: Mastering Screenshots on Your Chromebook
In today’s digital world, capturing screenshots has become an essential skill. Whether you need to save a web page for reference, document a conversation, or share a funny moment online, screenshots come in handy. This guide empowers you to conquer the art of taking screenshots on your Chromebook, exploring different methods and offering helpful tips for managing your captured images.
Understanding Chromebooks: A Primer
Chromebooks are laptops powered by Google’s Chrome OS, a lightweight operating system designed for simplicity and cloud-based functionality. While Chromebooks lack some features of traditional laptops, taking screenshots is a breeze. Here’s a quick overview of the Chromebook landscape:
- Interface: Chromebooks feature a minimalist interface centered around the Chrome web browser. Most functionalities are accessed through web apps or browser extensions.
- Limited Local Storage: Chromebooks typically have less local storage compared to traditional laptops. This reinforces their cloud-focused approach.
These characteristics are important to consider when choosing a screenshot method, as some may involve saving captured images locally or on cloud storage.
Capturing Your Screen: Three Effective Methods
There are three primary methods for taking screenshots on your Chromebook:
Method 1: Keyboard Shortcut (Most Common)
This is the quickest and most convenient method for capturing your entire screen:
-
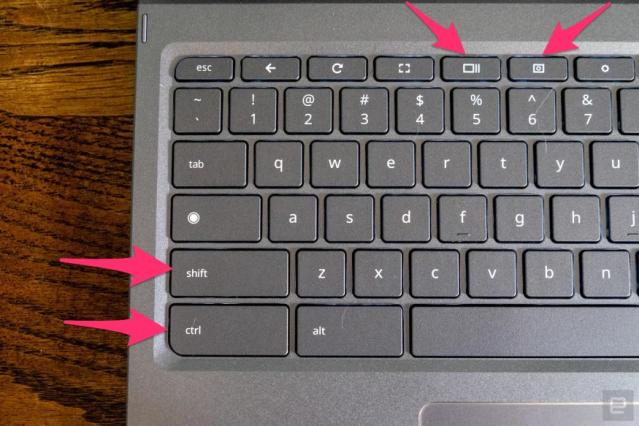
Locate the Keys: Look for the following keys on your Chromebook keyboard:
- Search/Launcher key (usually a magnifying glass icon)
- Shift key
- Window switcher key (often depicted by a rectangle with two vertical lines)
-
Press the Keys Simultaneously: Hold down the Search/Launcher key + Shift key + Window switcher key all at once. You’ll hear a camera shutter sound, indicating a successful capture.
-
Finding Your Screenshot: The captured image will be automatically saved as a PNG file in the “Downloads” folder within your Chromebook’s file manager.
Method 2: Screen Capture Tool (More Control)
This method offers more control over what you capture, allowing you to take screenshots of specific areas or windows:
-
Access the Quick Settings: Look for the clock icon in the bottom right corner of your screen. Click on it to reveal the Quick Settings panel.
-
Locate Screen Capture: Within the Quick Settings panel, find the “Screen Capture” tile. It might be located under the “More” section if you don’t see it immediately.
-
Choose Your Capture Option: Clicking the “Screen Capture” tile will present you with three choices:
- Capture entire screen: This option functions similarly to the keyboard shortcut method.
- Capture selected area: Drag your mouse to select a specific portion of your screen you want to capture.
- Capture window: Click on a specific window to capture only its contents.
-
Saving Your Screenshot: Once you’ve chosen your capture option, the image will be automatically saved in your “Downloads” folder.
Method 3: Chrome Extensions (Additional Features)
The Chrome Web Store offers various screenshot extensions, providing additional functionalities beyond the built-in Chromebook methods. Here are some popular options:
- Awesome Screenshot: This extension allows annotations, editing tools, and cloud storage options for your screenshots.
- Lightshot: This user-friendly extension facilitates quick screen captures with basic editing features.
- FireShot: This feature-rich extension offers various capture modes, editing tools, and cloud storage integration.
Important Note: Before installing any Chrome extension, ensure it has positive reviews and comes from a reputable developer to avoid malware risks.
Managing Your Screenshots: Organization is Key
With frequent screenshots, keeping your “Downloads” folder organized can become cumbersome. Here are some tips for managing your captured images:
- Create Folders: Organize your screenshots by creating folders within your “Downloads” folder based on project, date, or category.
- Utilize Labels: Chromebook’s file manager allows you to add labels to your screenshots for easier searchability.
- Consider Cloud Storage: If storage space is limited on your Chromebook, consider using cloud storage services like Google Drive to store your screenshots.
Beyond the Basics: Advanced Tips and Customization
For Chromebook power users, here are some additional tips for taking screenshots:
- Partial Screenshot with Keyboard Shortcut: While the standard keyboard shortcut captures the entire screen, you can modify it for partial screenshots. Hold down the Ctrl key instead of the Shift key along with the Search/Launcher key and Window switcher key. This allows you to select a specific area for capture.
- Annotating Screenshots: If you don’t use a screenshot extension with editing features, you can use Chromebook’s built-in “Files.