How to Show the Ruler in Microsoft Word
The ruler in Microsoft Word is a valuable tool that helps users align text, set margins, and adjust indents with precision. This article will guide you through the steps to display the ruler in Word and explain its various uses.
Displaying the Ruler
To show the ruler in Microsoft Word, follow these steps:
- Open Your Document:
- Start by opening your Word document.
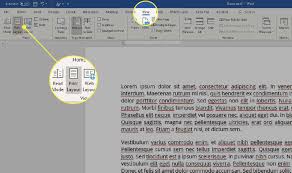
- Navigate to the View Tab:
- Click on the “View” tab located in the ribbon at the top of the Word window.
- Enable the Ruler:
- In the “Show” group within the View tab, check the box next to “Ruler” to display the horizontal and vertical rulers.
- Displaying the Vertical Ruler:
- If the vertical ruler is not visible, you can enable it by going to the “File” tab, selecting “Options,” navigating to the “Advanced” tab, and checking the box for “Show vertical ruler in Print Layout view”.
Using the Ruler
The ruler in Word serves multiple purposes, including setting margins, indents, and tab stops.
Setting Margins
- Adjusting Margins:
- To adjust the margins, hover your pointer over the center of the left or right end of the horizontal ruler until your pointer becomes a double arrow. Then, slide the double-arrow to the right or left to adjust the margin. For top and bottom margins, use the vertical ruler on the left side of the document.
- Precise Measurements:
- For precise measurements, press and hold the Alt key on your keyboard as you move any of the markers on the ruler.
Indenting Text
- First Line Indent:
- To indent the first line of each paragraph, place your cursor in one of the paragraphs, select the Home tab, and choose “Select Text with Similar Formatting” to select all paragraphs. Then, move the top ruler marker to the right to the desired indent length.
- Hanging Indent:
- To create a hanging indent, place your cursor inside the paragraph and adjust the hanging indent marker on the ruler. This extends the first line of the paragraph farther to the left than the rest of the lines.
Setting Tab Stops
- Types of Tab Stops:
- The ruler allows you to set different types of tab stops:
- Left Tab: Aligns text to the left.
- Center Tab: Centers text.
- Right Tab: Aligns text to the right.
- Decimal Tab: Aligns numbers around a decimal point.
- Bar Tab: Inserts a vertical bar at the tab position.
- Setting a Tab Stop:
- Click on the bottom of the horizontal ruler where you want to set the tab stop. Select the type of tab stop from the options available at the left end of the horizontal ruler.
- The ruler allows you to set different types of tab stops:
Table: Key Facts About Displaying and Using the Ruler in Word
| Fact | Description |
|---|---|
| Displaying the Ruler | View > Ruler (check box) |
| Displaying Vertical Ruler | File > Options > Advanced > Show vertical ruler in Print Layout view |
| Setting Margins | Adjust markers on horizontal and vertical rulers |
| Precise Measurements | Press and hold Alt key while moving markers |
| First Line Indent | Select text, move top ruler marker to desired indent length |
| Hanging Indent | Adjust hanging indent marker on the ruler |
| Types of Tab Stops | Left, Center, Right, Decimal, Bar tab stops |
| Setting Tab Stops | Click on the bottom of the horizontal ruler, select tab type |
FAQ Section
Q: How do I display the ruler in Microsoft Word?
A: To display the ruler, navigate to the “View” tab and check the box next to “Ruler” in the “Show” group.
Q: Why is the vertical ruler not visible?
A: If the vertical ruler is not visible, go to the “File” tab, select “Options,” navigate to the “Advanced” tab, and check the box for “Show vertical ruler in Print Layout view”.
Q: How do I set margins using the ruler?
A: To set margins, hover your pointer over the center of the left or right end of the horizontal ruler and slide the double-arrow to the right or left to adjust the margin. For top and bottom margins, use the vertical ruler.
Q: How can I make precise measurements while adjusting the ruler?
A: Press and hold the Alt key on your keyboard as you move any of the markers on the ruler for precise measurements.
Q: How do I indent the first line of each paragraph using the ruler?
A: Select the text, choose “Select Text with Similar Formatting,” and then move the top ruler marker to the right to the desired indent length.
Q: What types of tab stops can I set using the ruler?
A: You can set Left, Center, Right, Decimal, and Bar tab stops using the ruler.
References
- Microsoft Support: Using the ruler in Word – For detailed information on how to use the ruler in Word, including setting margins, indents, and tab stops.
- Wikipedia: Microsoft Word – For general information on Microsoft Word features and tools.
By following these steps and understanding the various uses of the ruler, you can enhance your document formatting skills and create more professional-looking documents in Microsoft Word.
Read more about it:https://greyhoundsverdevalley.com/what-level-does-machop-evolve/