Mastering the Mac Screen: Unveiling the Secrets of Screen Recording
For those who want to capture their Mac screen for presentations, tutorials, or personal recordings, the built-in screen recording tools offer a powerful and convenient solution. This section delves into the two primary methods for screen recording on Mac: using the Screenshot toolbar and QuickTime Player.
A Built-in Boon: Utilizing the Screenshot Toolbar
The Screenshot toolbar, readily accessible with a keyboard shortcut, provides a quick and easy way to capture your screen or a specific portion of it. Here’s how to use it for screen recording:
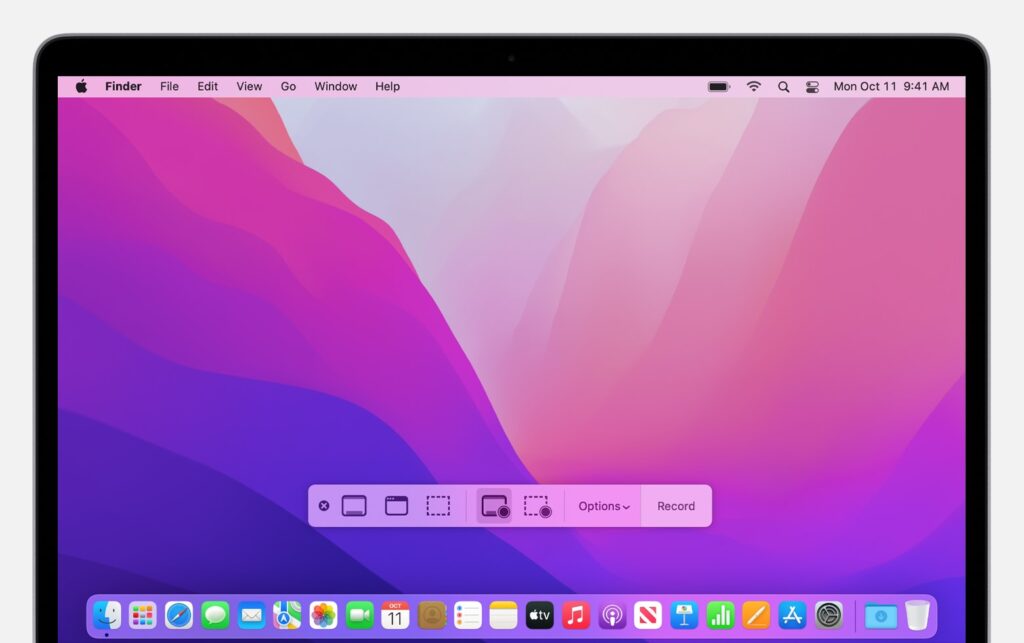
- Summon the Toolbar: Press Shift-Command-5 on your keyboard. This brings up the Screenshot toolbar with various options for capturing screenshots or recordings.
- Choose Recording Area: Click the record entire screen button (a rectangle with a record icon) to capture your whole screen. Alternatively, click the record selected portion button (a rectangle with a dotted outline and record icon) to capture a specific area. Drag your cursor to select the desired portion of the screen.
- Customize Your Recording (Optional): Click the Options button (gear icon) to access additional recording settings. Here you can:
- Choose microphone: Select the microphone you want to use to record audio while capturing your screen.
- Show mouse clicks: Enable this option to show your mouse clicks and movements during the recording.
- Set a timer: Start the recording after a short delay using the timer option.
- Choose save location: Specify where you want to save the recorded video file.
- Record, Stop, Save: Click the record button (red circle) to begin capturing your screen. A timer will display the recording duration in the menu bar. Click the stop button (square) in the menu bar or press Command-Control-Esc to end the recording. The recording will be saved as a .mov file in the location you specified (default: Desktop).
Benefits of Using the Screenshot Toolbar:
- Simple and Efficient: The toolbar offers a quick and user-friendly way to capture your screen without needing additional software.
- Customizable Options: Basic customization options like microphone selection and mouse click visibility enhance the recording’s functionality.
Delving Deeper: Screen Recording with QuickTime Player
QuickTime Player, pre-installed on all Macs, offers a more comprehensive screen recording experience with additional features. Here’s how to use it:
- Open QuickTime Player: Locate QuickTime Player in your Applications folder and launch the application.
- Initiate Screen Recording: Go to File > New Screen Recording. This opens a floating recording window at the top of your screen.
- Customize Settings (Optional): Click the arrow next to the record button to access settings. You can choose the microphone, show mouse clicks, or set a timer similar to the Screenshot toolbar options.
- Record, Stop, Save: Click the record button (red circle) to begin capturing your screen. Click the stop button (square) in the floating window or press Command-Control-Esc to end the recording. QuickTime Player will automatically open the recording for editing or saving. You can trim the recording, adjust audio levels, or export it to a different format.
Advantages of Using QuickTime Player:
- Enhanced Features: QuickTime Player provides additional functionalities like basic editing and exporting options.
- Microphone Selection: Choose from various microphones for optimal audio recording.
Choosing the Right Tool: Screenshot Toolbar vs. QuickTime Player
For basic screen recordings without extensive editing needs, the Screenshot toolbar is a quick and convenient option. If you require additional features like editing or microphone selection, QuickTime Player offers a more comprehensive solution.
Frequently Asked Questions
Q: Can I record only a specific window on my Mac screen?
A: Yes! Both the Screenshot toolbar and QuickTime Player allow you to record a specific portion of your screen.
- Screenshot Toolbar: Click the record selected portion button (rectangle with a dotted outline and record icon) and drag your cursor to select the desired window.
- QuickTime Player: While the recording window is displayed, click and hold the record button, then choose Record selected window from the menu that appears. Select the window you want to capture.
Q: How can I record my screen with audio narration?
A: Both methods described earlier allow you to record audio narration along with your screen capture.
- Screenshot Toolbar: In the Options menu (gear icon), choose the microphone you want to use for recording audio.
- QuickTime Player: Access the settings menu (arrow next to the record button) and select the desired microphone.
Q: Can I add annotations or shapes while recording?
A: Unfortunately, neither the Screenshot toolbar nor QuickTime Player offers built-in annotation features while recording. However, you can use third-party screen recording software with annotation capabilities. Some popular options include:
- Loom: A free and user-friendly screen recording tool with basic editing features and annotation options.
- Snagit: A more comprehensive screen recording and capture software with advanced editing tools and annotation functionalities (paid subscription required).
- Camtasia: A professional-grade screen recording software offering extensive editing features, annotations, and production tools (paid subscription required).
Q: What format are the recorded screen captures saved in?
A: By default, both methods save recordings in the .mov format, which is compatible with most video players. However, you can export recordings to other formats using QuickTime Player. Go to File > Export and choose the desired format from the options available.
Q: Where are my screen recordings saved?
A: Recordings captured with the Screenshot toolbar are saved by default on your Desktop as .mov files. You can specify a different save location in the Options menu before recording. QuickTime Player might prompt you to choose a save location after stopping the recording, or it will open the recording in the application for editing/saving.
Q: Are there keyboard shortcuts for starting and stopping recordings?
A: While there isn’t a dedicated shortcut to initiate recording, pressing Shift-Command-5 opens the Screenshot toolbar, where you can then click the record button. To stop recordings using either method, pressing Command-Control-Esc is a universal keyboard shortcut.
By understanding these methods and frequently asked questions, you can leverage the built-in screen recording features on your Mac to effectively capture your screen activity and share it with others. Remember, the choice between the Screenshot toolbar and QuickTime Player depends on your specific needs and desired level of customization. Happy recording!