Mastering the Art of Screen Recording on Your iPhone
In today’s fast-paced digital world, capturing what unfolds on your iPhone screen can be incredibly valuable. Whether you’re creating a tutorial, documenting a glitch, or sharing a funny moment with friends, screen recording offers a powerful tool for visual communication. This comprehensive guide will equip you with all the knowledge and steps needed to become a screen recording pro on your iPhone.
Unveiling the Screen Recording Feature: A Built-in Gem
The good news is that screen recording functionality is conveniently built right into your iPhone, eliminating the need for additional downloads or subscriptions. Here’s how to access it:
1. Activating Screen Recording through Control Center:
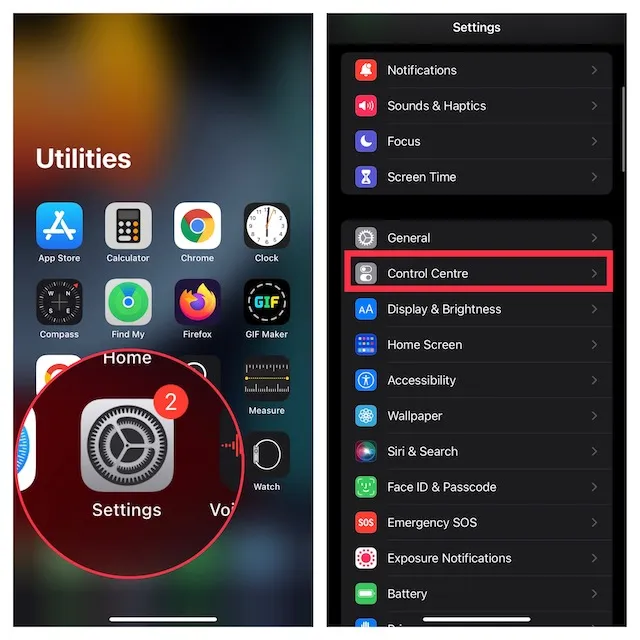
- Open the Settings app on your iPhone.
- Scroll down and tap on Control Center.
- Locate the More Controls section.
- Swipe left to see additional controls you can add.
- Find the Screen Recording icon (it looks like a circle with a dot inside) and tap the green plus sign next to it. This adds the screen recording function to your Control Center.
2. A Glimpse at Control Center:
- Swipe down from the top right corner of your iPhone screen (on iPhone X or later models) or swipe up from the bottom of the screen (on iPhone 8 or earlier models) to access Control Center.
Capturing Your Screen: A Step-by-Step Guide
Now that screen recording is readily available in your Control Center, let’s delve into the recording process:
1. Preparing for Takeoff:
- Open the app or navigate to the screen you want to record.
- Ensure you’re comfortable with the content you’re capturing, as everything on your screen will be recorded, including notifications and app switches.
2. Initiating the Recording:
- Open Control Center using the swipe gesture mentioned earlier.
- Locate the Screen Recording icon (a circle with a dot inside).
- Optional: If you want to record audio along with the screen activity, press and hold the Screen Recording icon. A pop-up menu will appear. Tap the Microphone icon (it looks like a microphone) to enable audio recording.
3. A 3-Second Countdown:
- Once you tap the Screen Recording icon (with or without audio enabled), a brief 3-second countdown will appear on your screen. This countdown gives you a chance to switch to the desired app or position your fingers before the recording begins.
4. Recording in Action:
- The screen recording will commence after the countdown. You’ll see a red bar at the top of your screen indicating that recording is in progress. The time elapsed during the recording will also be displayed on the red bar.
5. Stopping the Recording:
- There are two ways to stop recording:
- Open Control Center again and tap the red Screen Recording icon.
- Tap the red bar at the top of your screen and then tap Stop.
6. Finding Your Recordings:
- Once you stop recording, a thumbnail preview of your screen recording will appear in the bottom left corner of your screen. You can tap on the preview to view or edit your recording.
- All your screen recordings are automatically saved in the Photos app under a new album called Screen Recordings.
Pro Tips for Screen Recording Mastery:
- Silence is Golden (Optional): If you’re not recording audio commentary, consider disabling the microphone to avoid capturing background noise.
- Orientation Matters: The screen recording will capture the orientation of your phone when you start recording. Ensure your phone is in the desired portrait or landscape mode before hitting record.
- Editing Magic (Optional): The Photos app allows you to trim your screen recording, removing unwanted sections at the beginning or end.
Frequently Asked Questions about Screen Recording on iPhone
Q: My iPhone doesn’t have the Screen Recording icon in Control Center. What can I do?
- Make sure your iPhone is running on iOS 11 or later. Screen recording was introduced in this version of the iOS operating system.
- If you have an older iPhone that can’t be updated to iOS 11 or later, you can explore third-party screen recording apps available on the App Store. However, be cautious and choose reputable apps with good reviews.
Q: Can I record calls or video chats on my iPhone?
- The built-in screen recording feature on iPhone does not natively record calls or video chats. However, some third-party apps offer this functionality, but keep in mind that legal restrictions might apply depending on your region. It’s always best to check local laws and obtain consent before recording calls or video chats.