How to Remove a Stripped Screw: A Comprehensive Guide
Stripped screws can be a frustrating problem for anyone who works with tools, whether you’re a professional tradesperson or a DIY enthusiast. A stripped screw occurs when the head of the screw becomes damaged, making it difficult or impossible to remove with a standard screwdriver. This article will provide a detailed guide on how to remove a stripped screw, including various methods, tools needed, and tips for prevention. Additionally, we will include a FAQ section and a table summarizing the methods discussed.
Understanding Stripped Screws
A stripped screw is characterized by a damaged head that no longer allows the screwdriver to grip properly. This can happen for several reasons:
- Over-tightening: Using excessive force when tightening screws can strip the head.
- Incorrect Tool: Using the wrong size or type of screwdriver can lead to stripping.
- Wear and Tear: Over time, screws can wear down, especially if they are made of softer materials.
Tools and Materials Needed
Before attempting to remove a stripped screw, gather the following tools and materials:
- Screwdriver (flathead or Phillips, depending on the screw type)
- Rubber band or elastic band
- Pliers (needle-nose or locking pliers)
- Screw extractor kit
- Hammer
- Drill with drill bits
- Dremel tool (optional)
- Wood filler or super glue (for rethreading)
Methods for Removing a Stripped Screw
Method 1: Using a Rubber Band
- Place the Rubber Band: Take a wide rubber band and place it over the stripped screw head.
- Insert the Screwdriver: Press the screwdriver into the rubber band and turn slowly. The rubber band provides extra grip, which may allow you to turn the screw.
- Apply Pressure: If the screw begins to turn, continue applying pressure until it is fully removed.
Method 2: Using Pliers
- Grip the Screw: If the screw head is protruding enough, use needle-nose pliers to grip the sides of the screw head.
- Turn the Screw: Turn the pliers counterclockwise to remove the screw.
- Use Locking Pliers: If the screw is flush with the surface, use locking pliers to grip the screw tightly and turn it.
Method 3: Screw Extractor Kit
- Select the Right Extractor: Choose a screw extractor that fits the size of the stripped screw.
- Drill a Hole: Use a drill to create a small hole in the center of the stripped screw head.
- Insert the Extractor: Tap the extractor into the hole using a hammer.
- Turn the Extractor: Turn the extractor counterclockwise using a wrench. The extractor’s threads will grip the screw and allow you to remove it.
Method 4: Dremel Tool
- Create a Slot: If the screw head is too damaged, use a Dremel tool with a cutting wheel to create a new slot in the screw head.
- Use a Flathead Screwdriver: Insert a flathead screwdriver into the new slot and turn counterclockwise to remove the screw.
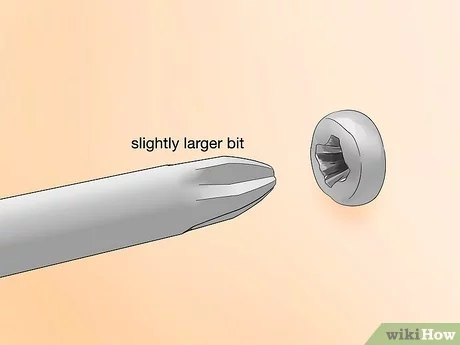
Method 5: Drilling Out the Screw
- Select a Drill Bit: Choose a drill bit slightly larger than the screw head.
- Drill into the Screw: Carefully drill into the center of the screw head until it is removed. Be cautious not to damage the surrounding material.
- Remove the Remnants: Once the head is removed, use pliers to extract the remaining screw shaft.
Preventing Stripped Screws
To avoid stripping screws in the future, consider the following tips:
- Use the Correct Tool: Always use the right size and type of screwdriver for the screw.
- Apply Even Pressure: When tightening screws, apply even pressure to avoid over-tightening.
- Pre-drill Holes: For wood screws, pre-drill holes to prevent splitting and stripping.
- Use Quality Screws: Invest in high-quality screws that are less likely to strip.
Summary Table of Methods
| Method | Tools Needed | Steps |
|---|---|---|
| Rubber Band | Rubber band, screwdriver | Place rubber band, insert screwdriver, turn slowly |
| Pliers | Pliers (needle-nose or locking) | Grip screw, turn counterclockwise |
| Screw Extractor Kit | Screw extractor, drill | Drill hole, insert extractor, turn counterclockwise |
| Dremel Tool | Dremel tool, cutting wheel | Create slot, use flathead screwdriver |
| Drilling Out the Screw | Drill, drill bits | Drill into screw head, remove remaining shaft with pliers |
FAQ Section
Q1: What causes a screw to become stripped?
A: A screw can become stripped due to over-tightening, using the wrong size screwdriver, or wear and tear over time.
Q2: Can I prevent screws from stripping?
A: Yes, by using the correct tools, applying even pressure, and pre-drilling holes, you can reduce the likelihood of stripping screws.
Q3: What should I do if none of the methods work?
A: If all methods fail, consider seeking professional help or using a more aggressive method like drilling out the screw.
Q4: Are there special tools for removing stripped screws?
A: Yes, screw extractor kits are specifically designed for removing stripped screws and can be very effective.
Q5: Can I use super glue to fix a stripped screw?
A: Yes, you can apply super glue to the screw and let it set before attempting to turn it again, but this is a temporary solution.
Q6: Is it safe to drill out a stripped screw?
A: Yes, but be cautious to avoid damaging the surrounding material. Use the appropriate drill bit size.
Q7: What if the screw is in a delicate material?
A: In delicate materials, proceed with caution. You may want to use a rubber band or pliers first to avoid damage.
Q8: How do I know if a screw is stripped?
A: A stripped screw will not turn when you apply pressure with a screwdriver, or it may turn loosely without coming out.
Q9: Can I rethread a stripped screw hole?
A: Yes, you can use a tap and die set to rethread the hole, or use a larger screw if the material allows.
Q10: Where can I find more information about screws and tools?
A: For more information, you can visit Wikipedia on Screws.
Conclusion
Removing a stripped screw can be a challenging task, but with the right tools and techniques, it is entirely manageable. By understanding the causes of stripped screws and employing the methods outlined in this guide, you can effectively remove stubborn screws and prevent future issues. Whether you’re a seasoned DIYer or just starting, these strategies will help you tackle any stripped screw situation with confidence. If you have further questions or need assistance, don’t hesitate to seek additional resources or professional help.