How to Draw a Chameleon: A Comprehensive Guide
Drawing a chameleon can be an enjoyable and rewarding experience for artists of all skill levels. This guide will provide step-by-step instructions on how to draw a chameleon, along with tips, techniques, and an FAQ section to help you refine your skills.
Table of Contents
- Introduction
- Understanding Chameleons
- Materials Needed
- Step-by-Step Drawing Instructions
- 4.1 Basic Shapes
- 4.2 Adding Details
- 4.3 Coloring Your Chameleon
- Tips for Drawing Realistic Chameleons
- Common Mistakes to Avoid
- Conclusion
- FAQ Section
1. Introduction
Chameleons are fascinating creatures known for their unique ability to change color and their distinctive physical features, such as their long tongues and prehensile tails. Drawing a chameleon not only helps improve your artistic skills but also allows you to appreciate the beauty of these reptiles.
2. Understanding Chameleons
Chameleons belong to the family Chamaeleonidae and are primarily found in Madagascar and Africa, although some species inhabit parts of Asia and Europe. They are known for their:
- Color-changing ability: Used for communication, temperature regulation, and camouflage.
- Unique eyes: Each eye can move independently, allowing them to see in two different directions at once.
- Long tongues: Can extend up to twice their body length to catch prey.
Table: Interesting Facts About Chameleons
| Fact | Description |
|---|---|
| Color Change Mechanism | Changes due to mood, temperature, and light exposure |
| Eye Movement | Independent movement allows for a wide field of vision |
| Tongue Length | Can be more than twice the length of their body |
| Habitat | Prefer warm climates with plenty of foliage |
For more detailed information about chameleons, you can visit Wikipedia on Chameleons.
3. Materials Needed
Before starting your drawing, gather the following materials:
- Pencil: For sketching the outline.
- Eraser: To correct mistakes.
- Paper: Any type will do, but sketch paper is preferred.
- Colored Pencils or Markers: For adding color.
- Reference Images: Pictures of chameleons for inspiration.
4. Step-by-Step Drawing Instructions
4.1 Basic Shapes
- Draw the Body:
- Start by sketching an oval shape for the body.
- Add a smaller oval at one end for the head.
- Outline the Tail:
- Draw a long, curved line extending from the back of the body for the tail.
- Make it spiral at the end.
- Add Legs:
- Sketch four legs using simple lines and ovals for joints.
- Position them so that they appear to support the weight of the body.
4.2 Adding Details
- Facial Features:
- Draw two large eyes on the head; make them bulge slightly.
- Add nostrils and a mouth; chameleons have a small smile.
- Skin Texture:
- Use short lines or dots along the body to create texture.
- Add scales by drawing small arcs or circles.
- Limbs:
- Refine the legs by adding claws at the end of each foot.
- Make sure to give them a slightly muscular appearance.
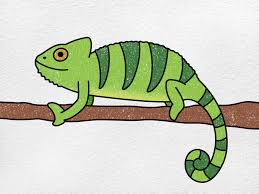
4.3 Coloring Your Chameleon
- Choose Colors:
- Chameleons can be green, brown, yellow, or even blue; choose colors based on your reference image or personal preference.
- Base Color:
- Apply a base layer of color using colored pencils or markers.
- Shading:
- Add darker shades along the underside of the body and in areas where shadows would naturally fall.
- Highlights:
- Use lighter colors or white to add highlights on top of the scales and around the eyes.
5. Tips for Drawing Realistic Chameleons
- Use References: Always have reference images handy to capture details accurately.
- Practice Shapes: Focus on getting the basic shapes right before adding details.
- Experiment with Colors: Don’t hesitate to try different color combinations; chameleons are known for their vibrant hues.
6. Common Mistakes to Avoid
- Proportions: Ensure that the head is proportionate to the body; avoid making it too large or small.
- Over-detailing Early On: Focus on outlines first before adding intricate details.
- Ignoring Texture: Remember that chameleons have textured skin; include this in your drawing.
7. Conclusion
Drawing a chameleon can be both fun and educational, allowing you to explore your creativity while learning about these unique reptiles. By following this guide and practicing regularly, you can develop your drawing skills and create stunning representations of chameleons.
8. FAQ Section
8.1 What is the best way to start drawing a chameleon?
Begin with basic shapes like ovals and circles to outline the body before adding details.
8.2 Do I need special materials to draw a chameleon?
No special materials are required; basic pencils, paper, and colored pencils will suffice.
8.3 How can I make my chameleon look more realistic?
Use reference images for accuracy in proportions and colors; also focus on shading and texture.
8.4 Can I draw a chameleon digitally?
Yes! Digital tools like tablets and drawing software can be used effectively for creating chameleon art.
8.5 Where can I find more information about drawing techniques?
For additional resources on drawing techniques, you can visit Wikipedia’s Drawing article.By following these guidelines and practicing regularly, you’ll be well on your way to mastering how to draw a chameleon! Enjoy your artistic journey!