How to Take a Screenshot on HP Devices: A Comprehensive Guide
Taking screenshots is an essential skill for anyone using a computer, whether for work, education, or personal use. HP devices, including laptops and desktops, offer various methods to capture screenshots, making it easy to save and share information visually. This article will provide a detailed guide on how to take screenshots on HP devices, including step-by-step instructions, tips, and troubleshooting. Additionally, we will include a FAQ section to address common questions.
Understanding Screenshots
A screenshot, also known as a screengrab or screen capture, is an image taken of what is displayed on your screen. Screenshots can be useful for:
- Documenting Information: Capturing important data or visuals for reports or presentations.
- Sharing Content: Quickly sharing images or information with colleagues or friends.
- Troubleshooting: Documenting errors or issues to seek help.
Overview of Screenshot Methods on HP Devices
HP devices running Windows or Chrome OS provide multiple ways to take screenshots. The methods vary slightly based on the operating system and the specific HP model. Below is a summary of the most common methods:
- Using the Print Screen Key
- Using Windows + Shift + S (Snip & Sketch)
- Using the Snipping Tool
- Using HP Screen Capture Software
- Using Third-Party Applications
- Taking Screenshots on HP Tablets
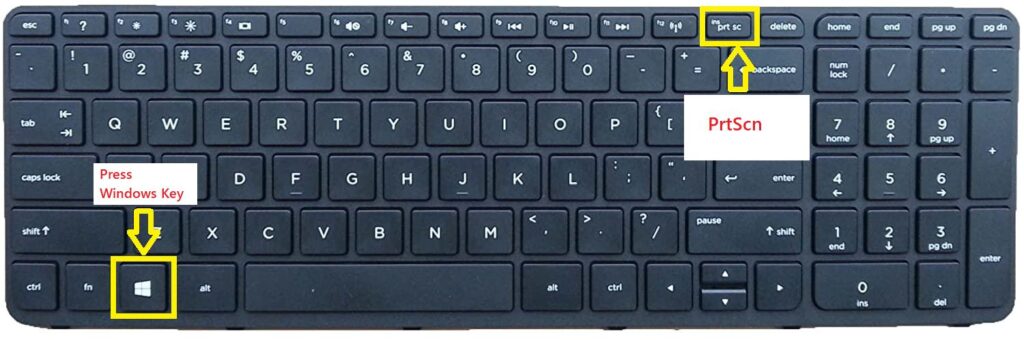
1. Using the Print Screen Key
The Print Screen key (often labeled as PrtScn, PrtSc, or PrtScn) is the most straightforward method for taking screenshots on HP devices.
Full-Screen Capture
To capture the entire screen:
- Press the Windows key + PrtScn simultaneously.
- Your screen will dim briefly to indicate a screenshot has been taken.
- The screenshot is saved in the Screenshots folder within the Pictures library.
Active Window Capture
To capture only the active window:
- Click on the window you want to capture to ensure it is in focus.
- Press Alt + PrtScn.
- Open an image editing program (like Microsoft Paint).
- Press Ctrl + V to paste the screenshot.
- Save the image as desired.
2. Using Windows + Shift + S (Snip & Sketch)
Windows 10 and 11 introduced the Snip & Sketch tool, which allows for more flexibility in capturing screenshots.
Steps:
- Press Windows + Shift + S.
- Your screen will dim, and a small menu will appear at the top of the screen with options for different types of snips:
- Rectangular Snip: Draw a rectangle around the area you want to capture.
- Freeform Snip: Draw a freeform shape around the area.
- Window Snip: Select a specific window to capture.
- Fullscreen Snip: Capture the entire screen.
- After selecting the area, the screenshot is copied to your clipboard.
- Open an image editing program and press Ctrl + V to paste and save the image.
3. Using the Snipping Tool
The Snipping Tool is a built-in application in Windows that allows users to take screenshots with various options.
Steps:
- Open the Snipping Tool from the Start menu.
- Click on New to start a new snip.
- Choose the type of snip you want (Free-form, Rectangular, Window, or Full-screen).
- Select the area you want to capture.
- The snip will open in the Snipping Tool window, where you can annotate or save it.
4. Using HP Screen Capture Software
Some HP laptops come with proprietary software for taking screenshots, such as HP Screen Capture.
Steps:
- Open the HP Screen Capture application from the Start menu.
- Select the type of capture you want (Full Screen, Window, or Area).
- Capture the screenshot and choose the save location.
5. Using Third-Party Applications
For users seeking advanced features, third-party applications can provide additional functionality for screenshotting.
Popular Third-Party Tools:
- Snagit: Offers extensive editing and annotation features.
- Lightshot: A lightweight tool for quick screenshots and editing.
- Greenshot: An open-source tool with many customizable options.
6. Taking Screenshots on HP Tablets
For HP tablets, the method to take a screenshot differs slightly.
Steps:
- Press and hold the Power button and the Volume Down button simultaneously.
- After a brief moment, the screen will flash, indicating a screenshot has been taken.
- Find the screenshot in your tablet’s photo gallery.
Table of Screenshot Methods
| Method | Description | Operating System |
|---|---|---|
| Print Screen Key | Captures the entire screen or active window. | Windows |
| Windows + Shift + S | Opens Snip & Sketch for customizable screenshots. | Windows 10/11 |
| Snipping Tool | Built-in tool for taking various types of screenshots. | Windows |
| HP Screen Capture | Proprietary software for HP devices to capture screenshots. | HP Devices |
| Third-Party Applications | Tools like Snagit, Lightshot, and Greenshot for advanced screenshotting. | Windows |
| Power + Volume Down (Tablets) | Captures the screen on HP tablets. | HP Tablets |
Tips for Taking Effective Screenshots
- Plan Your Screenshot: Ensure that the content you want to capture is clearly visible and organized.
- Use Annotations: If your tool allows it, annotate your screenshots to highlight important areas or provide context.
- Save in the Right Format: Choose a file format (like PNG or JPG) that suits your needs for quality and file size.
- Organize Your Screenshots: Create folders to keep your screenshots organized for easy access later.
Troubleshooting Common Issues
- Screenshot Not Saving: Ensure you are pressing the correct keys and check the default save location (usually the Screenshots folder).
- Blank Screenshots: If screenshots appear blank, ensure the window is not minimized or obscured.
- Snipping Tool Not Opening: If the Snipping Tool does not open, check for Windows updates or try restarting your device.
Frequently Asked Questions (FAQ)
Q1: How do I take a screenshot on an HP laptop?
A: You can take a screenshot by pressing the Print Screen key or using Windows + Shift + S for a customizable screenshot.
Q2: Where are my screenshots saved?
A: Screenshots taken with Windows + PrtScn are saved in the Screenshots folder within the Pictures library.
Q3: Can I edit my screenshots?
A: Yes, you can edit screenshots using image editing software like Microsoft Paint, Snagit, or any other image editor.
Q4: How can I take a screenshot of a specific area?
A: Use Windows + Shift + S to activate Snip & Sketch, which allows you to select a specific area to capture.
Q5: What if my Print Screen key is not working?
A: Check your keyboard settings and ensure that no other program is interfering with the Print Screen function. You can also try using the Snipping Tool or Snip & Sketch as alternatives.
Conclusion
Taking screenshots on HP devices is a straightforward process with multiple methods available to suit different needs. Whether you are capturing the entire screen, a specific window, or a selected area, HP devices provide the tools necessary to make this task easy and efficient. By following the steps outlined in this guide, you can enhance your productivity and communication through effective screenshotting.For more detailed information about taking screenshots and related topics, you can refer to this Wikipedia link.