How to Screenshot on a Samsung Laptop: A Comprehensive Guide
Screenshots are an essential tool in today’s digital age, allowing users to capture and share information quickly. Whether you’re a student needing to save an online lecture, a professional documenting a project, or a casual user wanting to share a funny meme, knowing how to take screenshots on your Samsung laptop is crucial. This comprehensive guide will explore various methods to capture screenshots on Samsung laptops, including keyboard shortcuts, built-in tools, and third-party applications.
Understanding Screenshots
What is a Screenshot?
A screenshot, or screen capture, is a digital image of what is displayed on your computer screen at a specific moment. Screenshots can be used for various purposes, including:
- Documentation: Capturing important information for reference.
- Sharing: Sending images of content to friends, colleagues, or social media.
- Troubleshooting: Providing visual evidence of technical issues for support teams.
- Creativity: Using images for presentations, reports, or creative projects.
Why Take Screenshots?
Taking screenshots can enhance communication and productivity. They allow you to convey information visually, making it easier for others to understand your context or ideas. Additionally, screenshots can serve as a quick reference for tutorials, guides, and important documents.
Methods to Take Screenshots on a Samsung Laptop
Samsung laptops run on the Windows operating system, which provides several built-in methods for taking screenshots. Below are the most common techniques:
1. Using the Print Screen Key
The Print Screen (PrtScn) key is a fundamental tool for capturing screenshots on Windows laptops, including Samsung models.
How to Use the Print Screen Key:
- Capture the Entire Screen:
- Press the PrtScn key. This captures everything displayed on the screen and copies it to the clipboard.
- Open an image editing program (like Paint) and paste the screenshot (Ctrl + V). Save the image to your desired location.
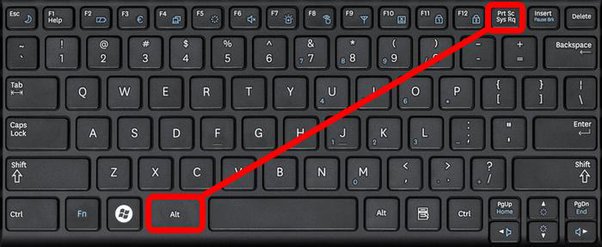
- Capture the Active Window:
- Press Alt + PrtScn. This captures only the currently active window.
- As with the full-screen capture, paste it into an image editing program and save it.
- Capture and Save Automatically:
- Press Windows + PrtScn. This captures the entire screen and saves it automatically in the “Screenshots” folder within the “Pictures” library.
2. Using the Snipping Tool
The Snipping Tool is a built-in application in Windows that allows users to take customized screenshots.
How to Use the Snipping Tool:
- Open the Snipping Tool: Search for “Snipping Tool” in the Start menu and open the application.
- Choose the Snip Type: Click on “Mode” to select the type of snip you want:
- Free-form Snip: Draw a free-form shape around the area you want to capture.
- Rectangular Snip: Drag the cursor to create a rectangle around the desired area.
- Window Snip: Capture a specific window.
- Full-screen Snip: Capture the entire screen.
- Take the Snip: After selecting the mode, click “New” to take a screenshot.
- Save the Snip: Use the “File” menu to save the snip to your desired location.
3. Using Snip & Sketch
Snip & Sketch is an updated version of the Snipping Tool, offering more features and flexibility.
How to Use Snip & Sketch:
- Open Snip & Sketch: Search for “Snip & Sketch” in the Start menu and open the application.
- Take a Screenshot: Click on “New” in the upper left corner. You can choose to take a rectangular snip, free-form snip, or full-screen snip.
- Edit the Screenshot: After taking the screenshot, you can annotate, highlight, or crop the image using the built-in editing tools.
- Save the Screenshot: Click on the disk icon or use the “File” menu to save the edited screenshot.
4. Using Windows Game Bar
The Windows Game Bar is primarily designed for capturing gameplay, but it can also be used to take screenshots.
How to Use Windows Game Bar:
- Open Game Bar: Press Windows + G to open the Game Bar.
- Capture Screenshot: Click on the camera icon or press Windows + Alt + PrtScn to take a screenshot.
- Find Your Screenshot: Screenshots taken with Game Bar are saved in the “Captures” folder within the “Videos” library.
5. Using Third-Party Applications
If you prefer more advanced features for taking and editing screenshots, several third-party applications are available:
- Lightshot: A lightweight tool that allows you to take screenshots quickly and edit them with annotations.
- Greenshot: An open-source screenshot tool that offers various capture options and editing features.
- Snagit: A powerful screen capture and recording tool with extensive editing capabilities, ideal for professionals.
Table: Summary of Screenshot Methods
| Method | Description | Steps to Use |
|---|---|---|
| Print Screen Key | Captures the entire screen or active window | Press PrtScn, Alt + PrtScn, or Windows + PrtScn |
| Snipping Tool | Allows for custom snips and editing | Open Snipping Tool, select mode, capture, save |
| Snip & Sketch | Updated snipping tool with editing features | Open Snip & Sketch, take a screenshot, edit, save |
| Windows Game Bar | Capture screenshots while gaming | Press Windows + G, then use the camera icon |
| Third-Party Applications | Advanced features for capturing and editing | Download and install the app, follow prompts |
Common Issues and Troubleshooting
1. Screenshot Not Working
If your screenshots are not working, ensure you are pressing the correct keys. Additionally, check if your laptop’s keyboard is functioning properly.
2. Screenshots are Dark or Low Quality
If the screenshots appear dark or low quality, check your screen brightness and adjust your screen resolution.
3. Can’t Find Your Screenshot
Screenshots taken with the Print Screen key are copied to the clipboard. If you can’t find your saved screenshots, check the “Screenshots” folder in your “Pictures” library or the “Captures” folder in your “Videos” library.
4. Using Third-Party Tools
If you choose to use third-party screenshot tools, ensure they are properly installed and updated. Familiarize yourself with their features and settings for optimal use.
FAQ Section
How do I take a screenshot on my Samsung laptop?
You can take a screenshot using the Print Screen key, Snipping Tool, Snip & Sketch, Windows Game Bar, or third-party applications.
Where are my screenshots saved on a Samsung laptop?
Screenshots taken with the Print Screen key are typically saved in the “Screenshots” folder within the “Pictures” library. Screenshots taken with the Game Bar are saved in the “Captures” folder within the “Videos” library.
Can I take a screenshot of a specific window?
Yes, you can capture a specific window by pressing Alt + PrtScn or using the Snipping Tool or Snip & Sketch to select the window.
What if my screenshots are not saving?
Ensure you are using the correct key combinations and check your storage settings. If issues persist, try restarting your laptop or checking for software updates.
Are there any third-party tools recommended for taking screenshots?
Yes, popular third-party tools include Lightshot, Greenshot, and Snagit, which offer additional features for capturing and editing screenshots.
Where can I find more information about taking screenshots on a Samsung laptop?
For additional information, you can visit the Wikipedia page on Screenshots.
Conclusion
Knowing how to take screenshots on your Samsung laptop is an invaluable skill that can enhance your productivity and communication. With various built-in methods and third-party applications available, capturing your screen has never been easier. Whether you’re documenting important information, sharing visuals, or creating tutorials, mastering these techniques will empower you to navigate your digital world more effectively.