Using the Autofill feature in Microsoft Excel can significantly enhance your productivity and efficiency when working with data. This powerful tool allows users to quickly fill in data series, replicate formulas, and automate repetitive tasks. This comprehensive guide will cover everything you need to know about using Autofill in Excel, including its various applications, step-by-step instructions, tips, and troubleshooting advice.
Understanding Autofill in Excel
What is Autofill?
Autofill is a feature in Excel that enables users to automatically fill cells with data based on a predefined pattern. This can include numbers, dates, text, and formulas. The Autofill handle, a small square located in the bottom-right corner of a selected cell or range, is used to extend the data series or replicate formulas.
Benefits of Using Autofill
- Time-Saving: Autofill allows you to quickly fill in large amounts of data without manual entry.
- Consistency: It ensures that data is entered consistently across cells.
- Error Reduction: By automating data entry, Autofill minimizes the risk of human error.
- Pattern Recognition: Excel can recognize and replicate patterns, making it easier to create sequences.
How to Use Autofill in Excel
Basic Steps for Using Autofill
- Enter Initial Data: Start by entering the first value(s) in a cell or cells. For example, if you want to create a series of numbers, enter “1” in cell A1 and “2” in cell A2.
- Select the Cells: Highlight the cells containing the initial data.
- Locate the Autofill Handle: Move your cursor to the bottom-right corner of the selected cell(s) until it changes to a small black cross (+).
- Drag the Autofill Handle: Click and drag the Autofill handle down or across the cells where you want to fill in the data.
- Release the Mouse Button: Once you have highlighted the desired range, release the mouse button. Excel will automatically fill the cells based on the identified pattern.
Examples of Using Autofill
1. Filling a Series of Numbers
- Step 1: Enter “1” in cell A1 and “2” in cell A2.
- Step 2: Select both cells.
- Step 3: Drag the Autofill handle down to fill the series (e.g., 3, 4, 5, etc.).
2. Filling Days of the Week
- Step 1: Enter “Monday” in cell A1.
- Step 2: Drag the Autofill handle down to fill in the rest of the week (Tuesday, Wednesday, etc.).
3. Filling Months of the Year
- Step 1: Enter “January” in cell A1.
- Step 2: Drag the Autofill handle down to fill in the subsequent months (February, March, etc.).
4. Filling Dates
- Step 1: Enter a date (e.g., “01/01/2024”) in cell A1.
- Step 2: Drag the Autofill handle down to fill in the subsequent dates.
Using Autofill with Formulas
Autofill can also be used to replicate formulas across multiple cells. Here’s how:
- Enter the Formula: Type a formula in a cell, such as
=A1+B1in cell C1. - Select the Cell: Click on the cell with the formula.
- Drag the Autofill Handle: Drag the handle down or across to copy the formula to adjacent cells.
- Automatic Adjustment: Excel will automatically adjust the cell references based on the position of the new cells (e.g.,
=A2+B2in C2).
Customizing Autofill Options
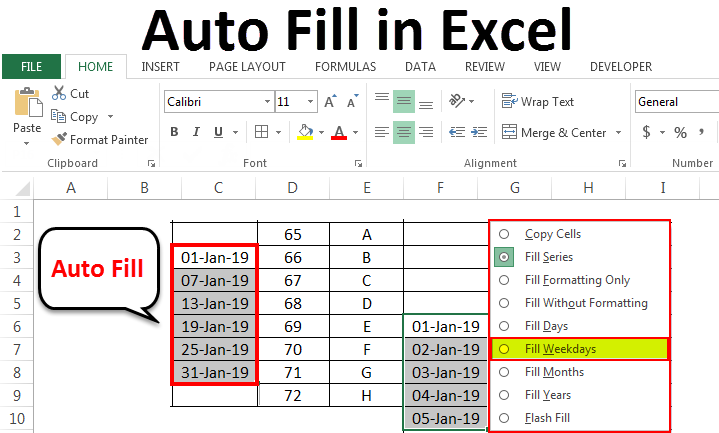
After using Autofill, a small icon appears at the bottom-right corner of the filled range. Clicking this icon provides additional options:
- Fill Series: Continue the series based on the initial data.
- Fill Without Formatting: Fill the cells without applying any formatting from the original cells.
- Flash Fill: Automatically fill in values based on patterns recognized in your data.
Advanced Autofill Techniques
Creating Custom Lists
You can create custom lists for Autofill, which is useful for frequently used data. Here’s how:
- Go to File > Options: Open Excel options.
- Select Advanced: Scroll down to the General section.
- Edit Custom Lists: Click on “Edit Custom Lists.”
- Add Your List: Enter your custom list (e.g., “Q1, Q2, Q3, Q4”) and click “Add.”
- Use Autofill: Now, when you type “Q1” and drag the Autofill handle, it will continue the list.
Autofill for Non-Sequential Data
Autofill can also be used for non-sequential data, such as repeating values:
- Enter the Value: Type a value (e.g., “Yes”) in a cell.
- Select the Cell: Click on the cell.
- Drag the Autofill Handle: Drag down to fill the cells with the same value.
Using Autofill for Conditional Formatting
You can use Autofill in conjunction with conditional formatting to highlight specific data patterns:
- Select the Range: Highlight the range of cells.
- Apply Conditional Formatting: Go to Home > Conditional Formatting and set your rules.
- Use Autofill: Autofill can help fill in data that meets the conditions set.
Troubleshooting Autofill Issues
Common Problems
- Autofill Not Working: Ensure that you have entered at least one or two values for Excel to recognize a pattern.
- Incorrect Filling: If Excel fills the cells incorrectly, check the initial values for consistency.
- Formula Errors: If formulas do not adjust correctly, ensure that relative references are used (e.g., A1 instead of $A$1).
Tips for Successful Autofill
- Use Clear Patterns: Ensure your initial data is clear and follows a recognizable pattern.
- Check Settings: Verify that Autofill is enabled in Excel options.
- Practice with Different Data Types: Experiment with numbers, dates, and text to understand how Autofill behaves with each.
Summary Table of Autofill Features
| Feature | Description | Example Usage |
|---|---|---|
| Series Filling | Automatically fills a series of numbers or dates. | Filling 1, 2, 3, or January, February, etc. |
| Formula Replication | Copies formulas while adjusting cell references. | =A1+B1 becomes =A2+B2 in the next row. |
| Custom Lists | Allows users to create and use custom data lists. | Filling quarters (Q1, Q2, Q3, Q4). |
| Flash Fill | Automatically fills in values based on patterns. | Extracting first names from full names. |
| Fill Without Formatting | Fills cells without applying original formatting. | Copying values only. |
FAQ Section
Q1: What is Autofill in Excel?
A1: Autofill is a feature in Excel that allows users to automatically fill cells with data based on a recognized pattern.
Q2: How do I use Autofill for dates?
A2: Enter a date in a cell, select the cell, and drag the Autofill handle down or across to fill in subsequent dates.
Q3: Can I use Autofill with formulas?
A3: Yes, you can use Autofill to replicate formulas across cells, and Excel will adjust the references accordingly.
Q4: What should I do if Autofill is not working?
A4: Ensure you have entered at least one or two values for Excel to recognize a pattern. Check your Excel settings to confirm Autofill is enabled.
Q5: How can I create a custom list for Autofill?
A5: Go to File > Options > Advanced, then click “Edit Custom Lists” to add your custom data.
Q6: Can Autofill fill in non-sequential data?
A6: Yes, you can use Autofill to repeat values by entering a single value and dragging the handle.
Q7: What is Flash Fill?
A7: Flash Fill is a feature that automatically fills in values based on patterns recognized in your data, useful for formatting and data extraction.
Q8: How do I access Autofill options after filling?
A8: After using Autofill, a small icon appears at the bottom-right corner of the filled range. Clicking it provides additional options like “Fill Series” or “Flash Fill.”
Q9: Can I use Autofill for text?
A9: Yes, Autofill can be used to fill in text patterns, such as names or categories.
Q10: Where can I find more information about Excel features?
A10: For detailed information, you can visit the Wikipedia page dedicated to Microsoft Excel.
Conclusion
The Autofill feature in Excel is an invaluable tool for anyone looking to improve their data entry efficiency. By understanding how to use Autofill effectively, you can save time, reduce errors, and streamline your workflow. Whether you are filling in numbers, dates, or formulas, mastering Autofill can significantly enhance your productivity in Excel. With practice and experimentation, you will become proficient in using this powerful feature, allowing you to tackle more complex tasks with ease.