How to Draw a Star
Drawing a star can be a fun and creative activity. Whether you are looking to create a simple five-pointed star or a more complex design, this guide will provide you with various techniques and tips.
1. Drawing a Simple Five-Pointed Star
Materials Needed:
- Pencil
- Eraser
- Ruler (optional)
- Paper
Steps:
- Start with a Triangle:
- Draw an upside-down “V” shape. This will form the top point of your star.
- Create the Points:
- From the top point of the “V,” draw a diagonal line downwards to the left.
- Next, draw a horizontal line to the right, ensuring it is the same length as the first diagonal line.
- Finally, draw a diagonal line back to the bottom of the “V” to complete the star shape.
- Refine the Shape:
- Go over the lines with a darker pencil or a marker to make the star stand out.
- Erase any unnecessary guidelines.
2. Drawing a Six-Pointed Star (Star of David)
Materials Needed:
- Pencil
- Eraser
- Compass (optional)
- Ruler
Steps:
- Draw Two Overlapping Triangles:
- Start by drawing an equilateral triangle facing upwards.
- Next, draw another equilateral triangle facing downwards, overlapping the first triangle.
- Outline the Star:
- Trace the outer lines of both triangles to create a six-pointed star.
- Erase the inner lines where the triangles overlap.
3. Drawing a Seven-Pointed Star
Materials Needed:
- Pencil
- Eraser
- Ruler
Steps:
- Draw a Circle:
- Use a compass to draw a circle. This will help maintain symmetry.
- Mark the Points:
- Divide the circle into seven equal sections. You can use a protractor for accuracy.
- Mark these points on the circumference.
- Connect the Dots:
- Starting from one point, skip the next point and connect to the following one. Repeat this process until you return to the starting point.
- Finalize the Star:
- Go over the lines with a darker pencil or marker and erase any unnecessary guidelines.
4. Drawing a Complex Star (14-Point Star)
Materials Needed:
- Pencil
- Eraser
- Ruler
- Compass
Steps:
- Draw a Circle:
- Start with a large circle using a compass.
- Mark the Points:
- Divide the circle into 14 equal sections. Again, a protractor will be helpful.
- Connect the Points:
- Following a pattern, connect every alternate point around the circle. This will create a complex star shape.
- Finalize:
- Darken the lines and erase any guidelines.
5. Drawing a Star Using the Grid Method
The grid method is a great way to ensure accuracy and proportion, especially for larger stars.Materials Needed:
- Pencil
- Eraser
- Ruler
- Graph paper
Steps:
- Create a Grid:
- Use graph paper to create a grid. Each square will represent a unit of measurement.
- Determine Star Size:
- Decide how large you want your star to be and mark the center on the grid.
- Outline the Star:
- Using the grid, plot the points of your star. For a five-pointed star, you will have five outer points and one inner point.
- Connect the points according to the star shape you want to create.
- Finalize the Drawing:
- Once you are satisfied with the outline, go over it with a darker pencil or marker and erase the grid lines.
6. Drawing Stars with Patterns
Adding patterns to your stars can enhance their visual appeal. This technique is great for creating unique designs.Materials Needed:
- Pencil
- Eraser
- Fine-tipped markers or pens
- Colored pencils or markers
Steps:
- Draw the Star:
- Start by drawing a basic star shape using any of the methods described above.
- Add Patterns:
- Inside the star, draw various patterns such as stripes, polka dots, or swirls. You can use a fine-tipped marker for detailed work.
- Color the Patterns:
- Use colored pencils or markers to fill in the patterns. Choose colors that complement each other for a vibrant look.
7. Drawing Stars in Different Styles
Stars can be drawn in various artistic styles, from realistic to abstract. Here are a few styles to consider:
Realistic Stars
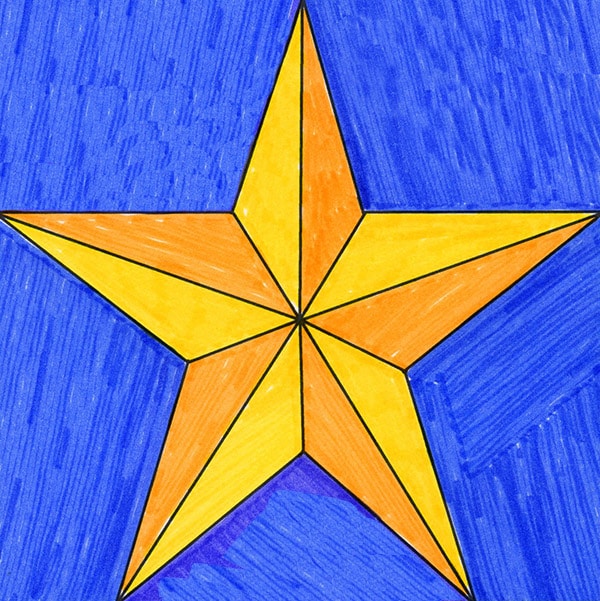
- Draw a Star Shape:
- Start with a basic star outline.
- Add Shading:
- Use shading techniques to give the star a three-dimensional look. This can be done by darkening one side and gradually lightening the other.
- Include Highlights:
- Add white highlights to the edges to simulate light reflection.
Abstract Stars
- Freeform Shape:
- Instead of a traditional star shape, create a freeform star using wavy lines and curves.
- Colorful Background:
- Fill the background with vibrant colors or patterns to make the star pop.
- Mixed Media:
- Experiment with different materials like glitter, paint, or collage to create a unique star design.
8. Incorporating Stars into Other Art Forms
Stars can be integrated into various art forms, including:
- Painting: Use stars as focal points in a night sky painting.
- Crafting: Create star-shaped decorations for holidays or events.
- Digital Art: Use graphic design software to create star patterns and designs.
- Tattoo Design: Stars are popular motifs in tattoo art, often combined with other elements.
Artistic Applications of Stars
Stars have significant meanings in various cultures and contexts. Here are some artistic applications:
- Symbolism: Stars often symbolize hope, guidance, and aspirations. Incorporating stars into your artwork can convey these themes.
- Holiday Decorations: Stars are commonly used in holiday decorations, especially during Christmas. Consider creating star ornaments or garlands.
- Children’s Art Projects: Stars are a favorite subject in children’s art. Encourage kids to explore different styles and colors when drawing stars.
Tips for Drawing Stars
- Practice: The more you practice, the better your stars will look.
- Use Guidelines: Lightly sketch guidelines to help maintain symmetry.
- Experiment: Try different sizes and styles of stars to find what you like best.
Table of Star Drawing Techniques
| Star Type | Method Used | Complexity Level |
|---|---|---|
| Five-Point Star | Triangle method | Easy |
| Six-Point Star | Overlapping triangles | Medium |
| Seven-Point Star | Circle division and connecting dots | Medium |
| 14-Point Star | Circle division with complex lines | Hard |
FAQ Section
Q1: What materials do I need to draw a star?
A: You will need a pencil, eraser, ruler, and paper. For more complex stars, a compass may also be helpful.
Q2: How can I make my stars look better?
A: Practice regularly, use guidelines, and experiment with different styles and sizes.
Q3: Can I color my stars?
A: Yes! Once you have drawn your star, feel free to use colored pencils, markers, or crayons to decorate it.
Q4: What if I make a mistake?
A: Use an eraser to correct any mistakes. Lightly sketching your lines at first will make it easier to erase.
Q5: Are there different types of stars I can draw?
A: Yes, you can draw various types of stars, including five-pointed, six-pointed, seven-pointed, and more complex designs.
Additional Resources
For more information on drawing techniques and artistic styles, you can visit Wikipedia on Drawing.This guide serves as a comprehensive resource for anyone interested in learning how to draw stars, from simple to complex designs. Practice these techniques to enhance your drawing skills and create beautiful star shapes.